
Background
Three years ago, Nest announced their first smart thermostat clocking in at $250. While others balked at the price, I saw the value of something that could potentially reduce our family energy expenditure. And save money we did! Despite the upfront cost of the Nest, after having used the device that first twelve months, I estimated we dropped our gas and electric bill by $500 for the year. The second year, the savings continued. I offloaded my 1st generation Nest and upgraded to the 2nd generation Nest along with adding a few of the Nest Protect smoke alarms to the house.
But despite seemingly being all-in on the Nest platform, there recently have been a few changes to both their products and the thermostat market in general that have me rethinking our current setup – including potentially switching out to a new brand. First, Google acquired Nest. As much as I appreciate Google’s ability to find pretty much anything on the Internet, I have reservations in providing them too much data, especially when it comes to our home. Call me paranoid all you want, but that’s simply how I feel.
Second, the Protect product seemed so promising at first release. Our Nest is situated in the dining room which is rarely accessed when we are in the house, therefore the Nest can not accurately tell when we are home or not. With the wired Protects, Nest would be able to monitor our house for motion and help adjust the auto features which would alleviate the Nest from not being able to “see” us when we were home. I found that this really didn’t work so well when we had our four-legged furry friends running around the house during the day. I was hoping that the Protects would help build a better picture of our occupancy of our home, but it really didn’t seem to add much smarts to the Nest, just false alarms for movement.
Enter Ecobee3
To tell you the truth, I really didn’t pay that much attention to the Ecobee3 launch back in September. For the most part, I was happy with my Nest and really didn’t see much benefit to the Ecobee3. I was wrong. After noticing a few of the tech sites I follow start to post more about the Ecobee3, the more I became interested. This was especially the case when I payed attention to the remote sensors that can be added to the Ecobee3. Could this solve the problem that my current Nest platform has with not being able to determine not only occupancy of the house, but also the correct temperature for the different rooms?
The last item that swayed me into a purchase was Steve Jenkin’s Ecobee3 review. After reading his excellent breakdown of the product, including the good and bad, I decided to purchase the unit along with a couple of additional sensors for our home. Turns out the local Apple Store here in Indianapolis recently started carrying the Ecobee3. I put my order in and I was on my way. I was also able to find additional sensors at my local Best Buy to add to the Ecobee3 platform. Amazon is also selling the system if you’d rather shop there.
First impressions and Installation
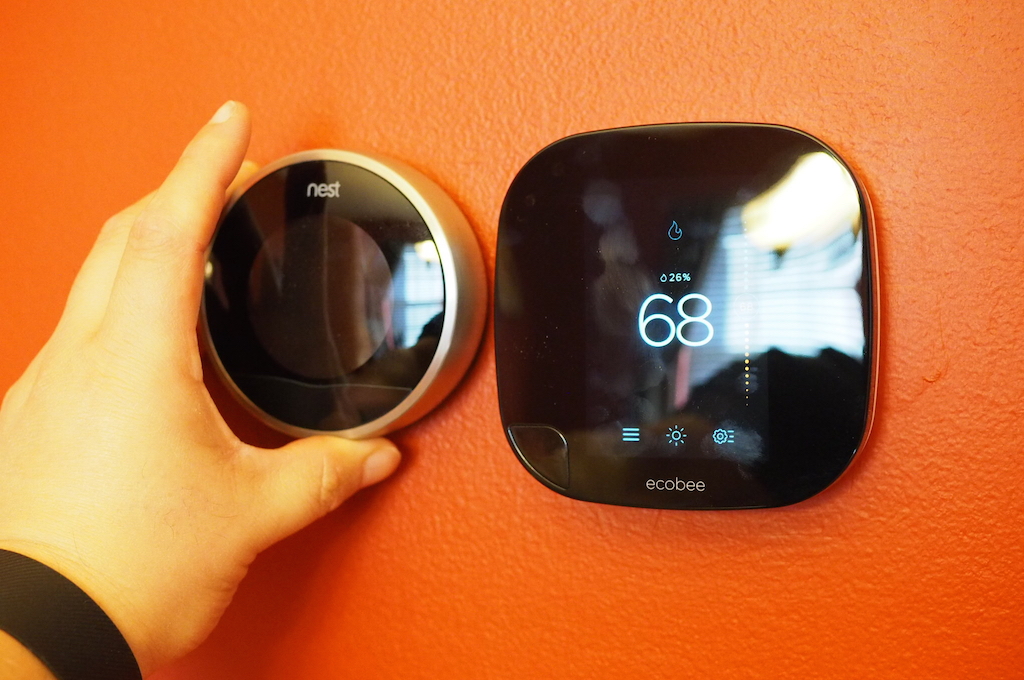
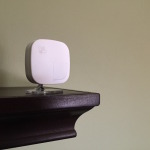
Unboxing the Ecobee 3, you are greeted with a nice sleek black slab. This is in contrast to the Nest circular design and shiny outer rim. In the box, you get the thermostat itself, one remote sensor (more on that in a bit), a Power Extender Kit (PEK), a large and small backplate, screws, and installation instructions. Although the Ecobee is made of mostly plastic, it feels refined. The material is a step down from the Nest, but in the end, I think the Ecobee looks great!

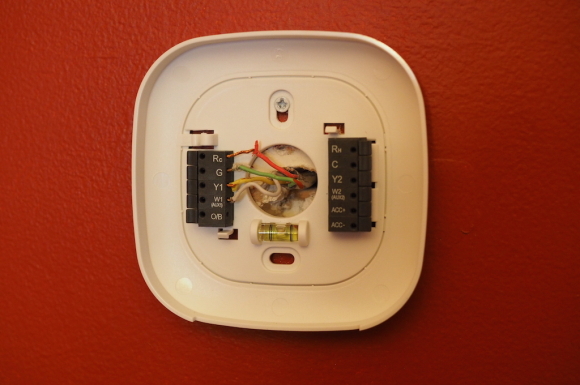
If you are familiar with installing the Nest, the Ecobee3 will be a very similar process. You have a backplate that mounts to your wall. You then take your existing wires and connect them to the correct inputs on the backplate. With my current setup of wires (Rc, W, Y, G wires), the Nest was able to draw power from the Rc wire. This is not the case with the Ecobee3. The Ecobee3 requires the C wire, or also known as the Common wire to draw power. Thankfully Ecobee includes what’s called a Power Extender Kit which is a fancy device that basically takes care of converting one of my existing wires (Rc) into a common C wire. I basically needed to open up my HVAC system and get to the logic board where the wires connect from the thermostat. I then installed the PEK and connected the wires appropriately so that I now had a C wire on the other end by the thermostat.
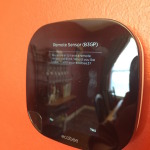
Once the PEK was properly connected, I then went back to the backplate and plugged in the Ecobee3. There was power. There were lights. There was great success! Considering I’ve never opened up my HVAC system like that, I was surprised to have it work the first time. :-) The Ecobee3 came to life and started it’s boot up process which only took a few minutes. As I waited for the boot up, I downloaded the iOS app for my iPhone so that I could continue with the registration process. The Ecobee3 presents a registration code that you need to use to complete the setup for the thermostat. Once registered, you then provide additional information about your home. After registration is completed, the Ecobee3 will start calibrating.
Using the Ecobee3
There are three ways to interact with the Ecobee3: mobile app, web interface, or just walking up to it old school style. :-)
First let me explain the different features of the Ecobee3 and then dive into the different interfaces. At a high level, the Ecobee3 supports adjusting the temperature at will, setting a schedule, or using the remote sensors to accommodate whole house temperatures.
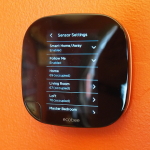
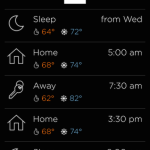
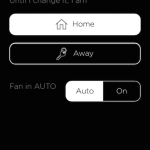
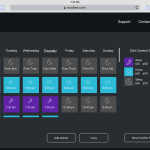
To adjust the temperature at will, you simply need to use one of the three methods to adjust the current setting. There is a toggle on the right side of the interface where you just move it up or down depending upon your desired setting. Ecobee3 also supports a schedule setting to allow for different modes within your home. The unit has three basic modes: Home, Away, Sleep. You are able to adjust the default temperatures for each of these settings. You are also able to set a define schedule for each of the modes. As an example, I like to wake up at 5:30am (don’t judge me). I can have the Ecobee3 start to warm up the house to the desired temperature by 5:30. When the Mrs. and I leave for work, we can have the temperature lowered to a certain point and then adjust when we come home at night. At night, Ecobee3 can automatically start to lower the temperature, making me happy and the Mrs. uncomfortable. ;-)
At this point, you are wondering what’s so special about the Ecobee3. My answer will be the remote sensors. When you purchase the unit, one remote sensor is included with the product. The remote sensors not only senses temperature, but also movement (occupancy). They run on a standard 2032 battery and wireless connect to the main Ecobee3 thermostat.
The ability to have these remote sensors around your house gives the Ecobee3 thermostat a better gauge on your entire home’s temperature. By adding additional sensors to your home, you are giving Ecobee a better understanding of what’s going on. The unique feature of these sensors is the “Follow Me” feature. When enabled, Ecobee3 will use the existing sensors in your home to adjust the temperature appropriately. If I’m in my upstairs office, Ecobee3 will understand that I’m only occupying this room and will average the temperature appropriately. The same if the Mrs. is downstairs watching TV while I’m upstairs, the Ecobee3 will know to adjust the temperature for both floors. This is something that the Nest could not provide. Sure, the Protects could sense when I walked by, but it could not detect the temperature and adjust accordingly. The remote sensors for the Ecobee3 provide this data back to the main thermostat.
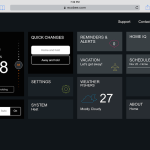
Ecobee3 Thermostat and Mobile Interface
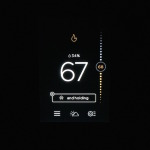
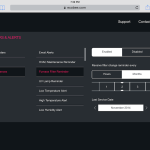
Both the Ecobee3 thermostat and mobile apps have a simple touch screen interface. This interface is the same on the unit itself, and the iPhone and iPad apps that I had installed. There is also an app in the Google Play store. To adjust the Ecobee3, you simply need to move the right side icon up or down to the desired temperature. On the main screen, there is also a weather button in the middle. This will bring up not only the current outside temperature, but also an expanded view of the next few days. You are also able to access the main settings of the Ecobee3 system from both mobile apps and the unit itself.
The one option that you have via the thermostat is the ability to see the remote sensors. This is not included within the mobile apps or web browser apps at all. You physically need to go to the thermostat to see the status of the remotes. To me, this is not that big of a deal, as long as the remote sensors are working properly. Just something to think about with this platform. I hope Ecobee can incorporate the remote sensor information into the mobile app.
Web Browser View
Ecobee also allows you to access your thermostat via a web browser, which gives a slightly different view of your system. The main addition to using the web browser is the ability to see the Home IQ function which shows you very discrete data about your Ecobee3.
Having browser access for the majority of functions is a great addition to the system. You can adjust pretty much any setting as you would with the mobile apps or just going up to the thermostat itself. The Home IQ is also a great feature. The Ecobee3 allows you to see hour by hour information regarding your home. This includes the time your HVAC or AC unit was turned on, the current temperature inside and outside, and also the humidity all around. You are also able to download this data from the Ecobee website if desired.
Looking forward
There are a few things I would like to see in future updates for the Ecobee3 platform. The first would be location awareness with my phone. As nice as remote sensors are to have within the home, I would still like to be able to have the house adjust temperature based on the location of me, not on a schedule. The other option to look forward to, would be Apple’s HomeKit. Seeing as Ecobee is now selling within the Apple Store, I would love for them to take advantage of HomeKit to provide additional functionality. Maybe we aren’t too far off based on this post on the Ecobee forums.
With my time with Ecobee3, I can say that it has performed very well! The addition of the remote sensors helps the entire system understand what’s going on in the house, and keep me from getting the “why is it so cold in here” talk from the Mrs. If you are looking to update your current thermostat, or want to replace your Nest, I would suggest that you look at the Ecobee3 as an alternative.
Yeah, I’m not sure what’s going on with Nest and Google. Plus they killed those announced Dropcam sensors. Also I appreciate the info-rich displays of the newer Honeywells and this ecobee3 compared to Nest. The latest software update looks slightly flashier but is still hampered by the physical click/wheel interface. Maybe it’s time for a change! That power conversion thing has me a little worried tho… especially since one of my two HVAC units is in the attic… that I’ve never been able to get to.
Thanks for the good write-up. I have 2 Nests but haven’t yet jumped to the Protect. I have always wanted support for remote sensors for occupancy and temp/humidity. One thing we like about the Nest is the auto-schedule feature that works most of the time. Is Ecobee3 have similar feature or is it use a predefined schedule. I too worried about the Google acquisition though less about the data they are collecting on me but more about a reduction in their innovation speed. The fact that Ecobee3 and Honeywell plus some others are up for comparison indicates that Nest needs to ramp up their game..
I’ve been using a Nest for close to two year now. For me with the actual unit, that is where I very rarely interact with the thermostat. 95% of the time I am using a web browser on a PC, or the app on my tablet or cell phone to deal with the thermostat.
Dave, totally forgot about the Dropcam Tabs fiasco. I was really looking forward to those, but then they cancelled them.
Mark, you are able to set a defined schedule, but the remote sensors give the Ecobee more data whether to turn the system on/off.
aaronwt, most of my interaction is via Nest app as well. However, for my wife it isn’t. And I’d really like that glanceable info and touch interaction that Honeywell and ecobee provide. If we don’t need a screen or interaction, may as well just go with Quirky’s new $80 tstat (well not really given issues Adam and I have experienced with their other products).
It looks like I can skip the HVAC wiring jumper if I went with ecobee. But I wish either of these guys would do some sort of a discount for those of us with builders silly enough to install two HVAC systems. Zones, people. Not more machines. $500 on thermostats is hard to swallow. FYI Looks like Best Buy will have Nest for $200 on Black Friday. Hm.
I’ve been looking at getting a Nest but have been holding off since they haven’t refreshed it in forever. I’m living in a 3 floor townhouse so the temperature varies a lot between the floors (and it has one zone, ugh). It sounds like the ecobee3 with remote sensors is a better choice than the Nest (I’m currently using a 5-2 old honeywell programmable, so haven’t been pressed to upgrade yet).
Is it worth waiting for Nest to build in remote sensors or will I be waiting forever?
“one of my two HVAC units is in the attic… that I’ve never been able to get to.”
Dynamite, Dave, dynamite. Handled properly, it’s perfectly safe.
Just remember to start with small blasts, and gradually increase the size of the blasts as you go. I really can’t emphasize that last point enough.
Speaking of the attic and dynamite, my ladders also aren’t tall enough to replace the battery in my bedroom smoke detector. Had been thinking to get a Protect when the time comes given its long battery life. But it seems like a pretty limited device … and won’t talk to my other smoke detectors.
Lou, who knows when the Nest will be refreshed… and what might be offered. There’s been no noise, no foreshadowing. ecobee being sold in Apple Stores is a positive sign in regards to the long term viability I would hope. Might be enough for me to make a move.
Adam, are you satisfied with the ecobee? Need more time? As in, will you be unloading your Nest? Should I do the same? Or buy yours? ;)
“Speaking of the attic and dynamite, my ladders also aren’t tall enough to replace the battery in my bedroom smoke detector.”
I believe you can also solve that issue with dynamite.
To dynamite! The cause of, and solution to, all of life’s problems.
Ugh. I jumped too soon on the smart thermostat bandwagon. Yes, I’ve had more savings than the $220 or so I spent on the Nest, but man, the ecobee’s remote thermostat setup would be super useful, but having made the huge leap in efficiency, any changes would be incremental and I’d not be able to justify it to the wife. Maybe the next place we’ll go that way.
I’m using the Honeywell Prestige IAQ. It also also supports remote sensors and will average temperature across multiple wireless remote sensors. I really like the “delta T” sensor feature that will measure the change in duct temperature from input to output and will alert me if the “delta T” falls below present limits. System performance is logged, but unfortunately can’t be viewed or downloaded from the Honeywell website.
How does the ecobee work with more complex systems? My home has 4 HVAC units powering 5 zones (yes crazy design additions over the years).
For example, how do the remote sensors know which unit to turn on to achieve the best heating/cooling mix? Do the zones interact with each other at all?
“If I’m in my upstairs office, Ecobee3 will understand that I’m only occupying this room and will average the temperature appropriately. The same if the Mrs. is downstairs watching TV while I’m upstairs, the Ecobee3 will know to adjust the temperature for both floors. This is something that the Nest could not provide.”
I got around this by setting it up as if the upstairs was a different house on the same account. Now the two Nests don’t talk to each other regarding motion sensing so one floor can go into auto-away while the other can keep the heat flowing. Of course that doesnt solve your problem of having the thermostat tucked away in the dining room,
Dave, ecobee also offers the Smart Si, runs for about $160 on Amazon. Non touch screen, doesn’t use the fancy new occupancy sensors, but can get a Zigbee module add-on, and can read various remote sensors (need to double check, I know it was slightly restricted compared to their previous touch screen unit).
We only have one zone (single story ranch) and bought our Smart Si this spring, so the ecobee3 was tempting but not needed. It has worked quite nicely I have to say. It does “learn” your system/house/+weather to get temps on target AT the target time. Programming is dead simple, can tweak away via app (even a unofficial but through API/PIN access WP8 app!) and most importantly:
it totally met the WAF.
(note: you can have multiple stats programmed in and named for multiple zone deployments, not completely sure about all those options obviously, but it could be worth a look)
Jed, in relation to multiple systems (I have two) this is what the company told me:
You can pair the thermostats into a group, and control them as a set should you wish (for example to synchronize your set points or your schedules), or you could control them separately.
Not sure how intelligently it all acts together. At the very least, one app to control both floors/systems in my case would at least be an improvement. :)
Glen, thanks for the alternate approach to noodle on.
“Had been thinking to get a Protect when the time comes given its long battery life.”
Worst product I ever used. Had seven protect’s in my house. They kept going off for no reason, would say there is smoke, but wouldn’t say from what room, which it is suppose to do and even time I called Nest, they couldn’t even see in their records they went off.
Even worse, when they did go off, hitting the button didn’t turn them off. I had to run around and take all seven of them off the wall, unscrew the back on all of them and take the batteries out. Netst replaced them with new ones, still had the same problem. Then Nest suggested I place tape over the sensor in case they were going off due to “dust”, which of course makes no sense since then they would be usless.
Only saving grace was that Nest (Google) took them all back, with no argument and cut me a refund check six weeks later.
Dang, Adam already sold his Nest on Amazon before I could make a decision. What to do, what to do. :) ecobee instead of my one Nest? Two ecobees? A second Nest @ $200 from Best Buy on Black Friday? Sell my Nest and hook back up my programmable Honeywell? Nothing at all?
Dan, thanks for the feedback. That seals the deal for me. Not willing to risk going up a ladder I don’t own more than once should I experience the false positives you did. Will stick with the guys who specialize in this stuff.
I wait for no one…just like technology. :-D
I’m holding out for a Black Friday sale on the Ecobee3. I sent them an email asking if they’d have any deals this week and this was their reply:
“Good morning Clint and thank you for your interest in ecobee3.
We have not announced any promotions or deals at the moment, but that does not mean we will not have a deal :)”
Here’s to hoping!
There is a black Friday sale on the bundle for $249.
http://slickdeals.net/f/7447762-ecobee-3-multi-room-thermostat-3-remote-sensors-249-w-fs-nest-alike-learning-thermostat?page=1&rpid=72344426&rp=3#originalPost
As foretold by prophecy!
http://www.vomitron.com/2013/01/30/making-nest-better/
I have loved my Nest, but if Ecobee has a single feature that Nest lacks, I would move to them immediately. The one LACKING feature of a Nest is that you can’t easily over-ride the learned behavior. I had family staying at my house for weeks, and couldn’t just say HOLD TEMPERATURE. I had to go into the web interface and manually change al of the settings and change them back when they left. Lots and lots of complaints about this on the Nest forum.
Hi Jim,
When you change the temperature on the Ecobee3, you can have it hold for a certain amount of time (2 hours, 4 hours, etc), or you can have it hold until you change the temperature again. This is the override feature you are describing.
Here is Ecobee’s page explaining it
https://www.ecobee.com/faq/how-do-i-set-a-temperature-hold-how-do-i-change-the-duration-of-the-temperature-hold-from-default/
Regarding changing the ecobee temperature, I have the Smart Si, and on ours we can either set a default choice, or have it give you the option every time. Options include: 2 hour, 4 hour, indefinite, until next transition (ie next program change), and change program. The last one is apparently removed for the moment in ecobee3 but hopefully they could add it back in. Lets you tweak your programming even easier once the initial rough configuration is set up.
Have any of you noticed your bill increase or decrease? My concern is that the heat will run more since it will be using sensors in a room that may be 3-4 degrees colder than the rest of the house. Thoughts?
Joe,
I don’t have the 3, so I can’t directly say, but there should be a couple things that will be at work in a house where the ecobee3 and remote sensors make sense.
Assume you have a big enough house (multi-story, likely?) and for whatever reason, heating cooling is uneven in different areas. Main floor gets one temp, the bedrooms on the north side always run hot in summer/cool in winter, etc.
So it sounds like you have a couple options with the way it reads the sensors — it can simply average them all, (in which case the main floor and the finicky bedrooms will always be “fighting”), or go by activity. [I am also not sure if you can then make a sensor the priority temp? Hopefully someone with one can answer that] In that case it would kick on when the bedroom is active, working to make that room a comfortable temp as well.
But then when that room is “inactive” it will remove the room from the equation over a period of time. I think Steve Jenkins had some replies from ecobee on an update at his site recently, iirc.
So without actual separate zones, it is probably the best approach for comfort AND savings — depends on who is using that room, of course. If it is your workshop, might not be super critical. Keeps your beer colder. If it is Mrs. Joe’s Craft Room however, proper heating…priceless.
;)
Thanks, Glen. I have a 2 zone system (one for each floor) but a couple of our rooms are usually 3-4 degrees colder because of windows, drafts, higher ceilings, etc. Assuming I have an Ecobee3 therm on each floor with an associated sensor in the other rooms, it should average the temperatures out.
So downstairs, if the therm reads 72 and the downstairs living room is 68, it will bump the therm area to 74 and living room to 70, right?
Hey Joe, here’s the update I mentioned at Steve’s site — he also links to a.forum that could have more info as well. http://www.stevejenkins.com/blog/2014/11/ecobee3-review-followup-two-month-update/
Like I said, I don’t have the 3 myself (we bought the Smart Si in the spring, and just have a small ranch/single zone), so my knowledge is pretty much just scouring write-ups online. :P
However, I think your assessment is correct — with the bonus that when the living room is empty temps will decrease again. I think. Okay, I have no idea. :D