Netgear ReadyNAS is a line of network attached storage devices that allows you to centralize all your content into one place. The main benefit being that you can then access your content from one place. The Netgear ReadyNAS 102, released about a year ago, incorporates a new modern UI for web management, a marketplace for apps that can be installed, and additional backup tools for your computers and mobile devices. Overall, the ReadyNAS is a fairly intuitive system that should fit basic storage needs while providing additional features with app support (and is a distant descendant of the highly acclaimed Infrant NAS line).
Hardware
The ReadyNAS 102 is the base model for the home ReadyNAS series. It provides 2 bays for hard drives and the ability to swap drives if your storage needs should grow. The 100 series is meant for home use with multiple users accessing the device. Along with the 100 series, Netgear also has a step up in performance with their 300 series, but those devices are geared towards business office crowd. You can view the different model’s on Netgear’s site here.
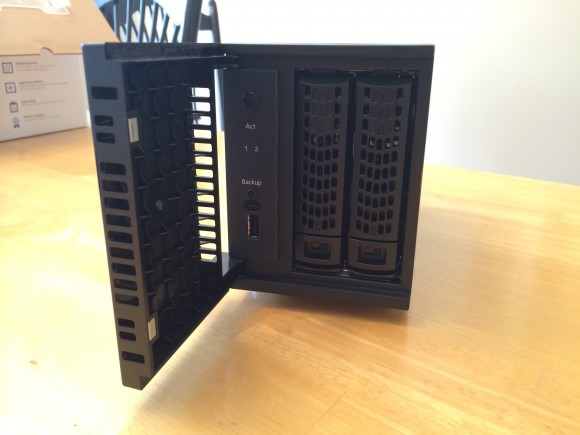
You can purchase the 102 with or without hard drives depending on how much you want to spend, and whether or not you have extra drives sitting around. The base 102 model starts out at $199 (diskless) and goes up depending on storage amount. Other options for the ReadyNAS 100 series included a 4 bay option. Our loaner review unit arrived with two preinstalled 1TB drives in RAID 1 mode, meaning that the data was mirrored on both drives and the over storage space was 1TB. You have the option to put the device in RAID 0 which would provide double the storage at the loss of drive mirroring.
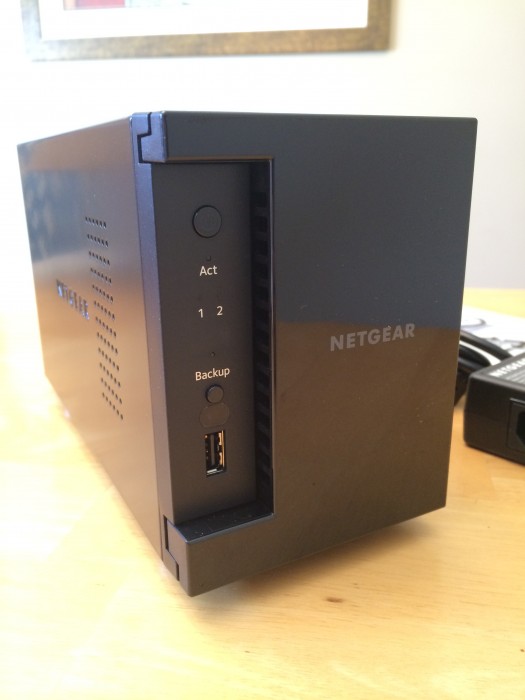
The ReadyNAS 102 comes with a Gigabit LAN port, 3 USB ports (2 USB 3.0, 1 USB 2.0), and an eSATA port. There are power and drive activity indicators on the front of the device so you have some idea of what’s going on with the unit. As far as computing power, the ReadyNAS 102 comes with a 1.2 Ghz Marvell Armada 370 processor and 512MB of RAM. A full list of specs can be found on Netgear’s site.
Unboxing and Setup
Unpacking the ReadyNAS, the drives were already installed. But if you buy the diskless version, it’s an easy installation nonetheless. Netgear provides a way to install drives without any tools. That’s a nice touch so that you don’t need to mess with small screws that would probably fall off the desk and get lost in the carpet anyways. :-)
After connecting the network/power cable and let the ReadyNAS finish booting, you are ready to being setup. Setup is as easy as going to http://readycloud.netgear.com from your local network.
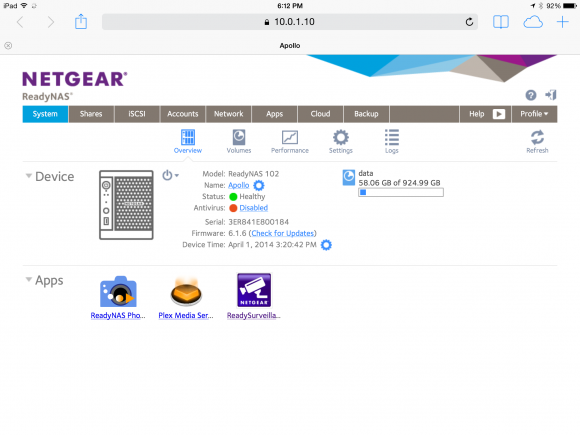
You click the discover button and any ReadyNAS boxes on your local network will be found. You will then need to setup a ReadyCloud account which provides both local and remote access to your ReadyNAS. Once you have completed account setup and any firmware updates (6.1.6 at the time of this review), you now have the ability to access your shared folders. The ReadyNAS automatically creates the following shares: Backups, Documents, Music, Pictures, Videos.
Overall the new OS 6 UI is very appealing and clean. Switching between administration pages is responsive. Unlike other NAS systems that try to provide a more desktop like experience, ReadyNAS OS 6 provides a fairly flat and traditional web layout for administration and content access.
Basic Features
The following are what I would consider the basic features of the ReadyNAS:
- Shared folders – The ReadyNAS allows you to create multiple shared folders to be access across multiple devices. As stated in the setup section, the ReadyNAS will automatically create a few shared folders by default, but you always have the ability to go in and create more. This is a nice way to separate out your data whether it’s music, videos, photos, backup, etc.
- User Accounts and Permissions – Along with the ability to create multiple shared folders, you have the ability to create multiple users and provide the correct permissions to your shared folders. For instance, you could have a user account that just has access to the Photos and Videos share, but not Music share. This is very handy for households that have multiple people accessing the NAS and you want to maintain the proper permission and structure. Our household is fairly simple. We just use one account to access all of our content. I cross my fingers and hope my wife doesn’t delete everything. Which leads to the next section, backups.
- Backups – ReadyNAS supports backups to the NAS as in content from a computer or mobile device. The ReadyNAS also provides a way to use Time Machine to backup your Mac. Once you have your content on the ReadyNAS, you also have the ability to backup the NAS itself to an external drive or additional ReadyNAS. The ReadyNAS will allow you to schedule these external backups as well. Most people think that just having mirrored drive is proper backup (RAID 1). In a sense it is, but if you ever lose both drives, you’ll lose everything. You still want to backup your configuration and data to a separate drive. That way if both your drives go bad, you can always throw in new ones and restore from an external backup. So if my wife decided to delete my entire collection of Quantum Leap tv shows, I would be able to restore the ReadyNAS to a previous state via a USB drive. The ReadyNAS allows for scheduled backups as well. You can specify a time for backups and it will only backup what has changed since the last one. That way you are not filling up external devices with redundant data. This is a great feature to have.
- Remote Access – By using ReadyCloud, you have the ability to access your content while away from home. You can browse and upload content via the web browser. To manage via the actual admin page, you must be on your local network.
My Needs and Usage
So you have a working ReadyNAS with basic operation. You have your shared folders and users created to your liking. You have uploaded your content. Now what? Here are the basic things I used the ReadyNAS in no particular order.
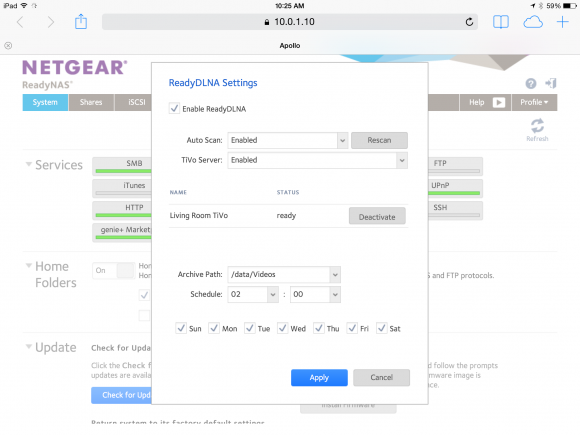
TiVo Backup – By turning on ReadyDLNA, the ReadyNAS allows you to switch on TiVo archiving. You have the ReadyNAS search for available TiVos on your local network. Once found, you need to activate using the Media Access Key (MAC) of your TiVo. You can then schedule a time when the ReadyNAS will begin archiving. Shows are stored by default in the Video share under TiVo and then the name of the TiVo that is being archived. This is a great feature for those looking to clear up space on their TiVo boxes.
iOS App – Netgear provides a ReadyCloud app to give you remote access to the ReadyNAS. The app will automatically find any ReadyNAS servers you have attached to your ReadyCloud account. You have basic browsing abilities within the app. For any kind of playback of media, you must first download, then play. The best feature of the iOS app is the ability to have automatic photo uploads. The ReadyCloud app will scan your iOS photo library and then backup to a specified folder on the ReadyNAS.
Dropbox – Dropbox integration allows for the ReadyNAS to create a folder in your Apps folder on your Dropbox account. Then any files put into that folder will be synced between Dropbox and a ReadyNAS share you designate.
Stream via Roku Media Player (RMP) – Roku has their own app that allows for DLNA streaming. When you launch the RMP, it will automatically search for any DLNA server on your local network. It easily found the ReadyNAS and I was able to browse through my different media (videos, photos, music). The one gotcha about the app is that you must be in the proper section for playback or else you will get a playback error. If you want to watch a video, you need to select the video channel first, then go into your videos folder for playback. This might sound like a “duh Adam” moment, but I found that I would be in a certain playback mode and not be able to find “compatible content”. All the channels show all the folders, so it can be confusing if you are just jumping around and don’t realize this.
Plex – An entire article could be written about the Plex server an app and all the configurations possible. To keep it simple, I’ll explain my setup. Having Plex installed on the ReadyNAS, the server combs through all the content I have uploaded and categorizes it nicely. Plex downloads any relevant information for each file as well. If you are missing a bunch of information for movies that you have converted to digital format, Plex will find that for you. My main playback devices are iOS devices, Roku, and Chromecast.
- iOS – Plex will serve up content to you on the fly. So if you away from home and want to watch a movie or listen to your music, you can do that (watch those data limits!). Also with the iOS apps, you can use AirPlay to stream to an Apple TV. This works for both videos and music. Recently, Plex also announced automatic photo backup if you have signed up for their PlexPass.
- Chromecast – Google has added a lot of new channels recently to the Chromecast, Plex being one of them. With the Plex iOS app, you can select a Chromecast and begin streaming instantly. The Chromecast will automatically turn on the TV and select the correct input (if your TV has HDMI-CEC), and begin playing what you have selected. The ability to have the TV turn on automatically and switch inputs removes friction. I’ve come to appreciate these little things that remove friction. :-)
- Plex on Roku – Plex has also created a Roku channel that allows you to stream content. The app will automatically find any Plex servers you have and allow you to browse content and playback.
Other 3rd Party Apps – If the above apps aren’t enough for you, Netgear provides a page for other 3rd party apps. You can find them here and either install them manually, or use the Apps section on the web admin page to install.
Conclusion
Netgear has put together a great low cost solution for centralizing your content. The freshness and speed of the new UI makes setup and configuration very easy. The ability to expand the functionality thru 3rd party apps increases the value of having this unit. I’ve only touched on a few of the features that I found useful. Feel free to explore Netgear’s site for additional apps that may interest you. In the meantime, if you are looking for an inexpensive way to consolidate your data, I would definitely look into a ReadyNAS system.
Are you able to do transcoding with Plex?
I have a Synology DS214play and Plex / ffmpeg doesn’t support transcoding yet.
Hi Ryan. I used Handbrake to encode all the video files I own into h.264/mp4 video format. I did not try other videos as I did not have access to any at the time. I can try to go back and see if Plex will transcode on the fly and also check the settings on the server to see if it’s setup that way. Do you have any examples videos I could try out?
I’d be interested in finding out if the videos from the TiVo backup app can be streamed via Plex. Adam, it looks like you have a TiVo, give it a shot?
@Jason will definitely try when I get home tonight. Think I need to add that specific folder to the Plex setup so it can scan. .TiVo files are really just MPEG2 video right?
This is a nice review, and this unit seems like a nice product.
But, as always, I’lll chime in with my recommendation to consider using a Mac Mini for your NAS controller.
Obviously, the up-front cost is noticeably higher, but:
– They have far more capabilities.
– They provide a far superior interface via headless screen sharing into the GUI (or UNIX ssh-ing).
– They last essentially forever, and being more capable and flexible, are forward-proofed for services that pop up long after purchase. My Mac Mini NAS is 5 years old, and is able to handle all my modern needs, including those that didn’t exist at purchase, thus amortizing the original cost nicely.
– They retain an absurd amount of their original value on the used market, should you want to sell years later.
– They transcode.
So, nothing wrong with going with the ReadyNAS, but if you plan forward, you might find that a Mac Mini NAS ends up being competitive on price, while being more capable from day one.
I bought a ReadyNAS Ultra 4 specifically for the TiVo backup feature and it works as advertised. My only issue with the setup is that my TiVo introduced a bug a year or two ago in the so the TiVo Premiere loses Closed Captions on videos that have been transferred to the NAS (or TiVo Desktop). This is not the case with the TiVoHD I have on the same network.
Anyway glad to hear that Netgear is till supporting the TiVo transferring…
Thanks for the review. I have been considering the latest Netgear NAS devices and I have a Tivo Roamio Pro. I’m glad they still have the archive feature. One thing I’ve found out, now that I have 3 terabytes of storage, is that it takes a long time to scroll through all of the tv shows, even with folders. I imagine it would be even worse on the NAS with archived tv recordings! I may still by one because they seem to work well and price is low.
Chucky, I have wanted to try you Mac Mini suggestion. I’ve see how Plex works on the Mac, and it is very slick. However, I’m so used to using Windows and I’m hesitant to switch from something that works for me. Also, can you watch your Tivo recordings through Plex on the Mac Mini? if so, how do you watch them? Do you hook yours up to you HDTV? Do you connect a Drobo to the Mac Mini for extra storage?
“Chucky, I have wanted to try you Mac Mini suggestion. I’ve see how Plex works on the Mac, and it is very slick.”
Indeed it is. They don’t call it their ‘flagship’ client for nothing.
“Also, can you watch your Tivo recordings through Plex on the Mac Mini?”
Yup. Once kmttg has automatedly decoded the .tivo files to .mpeg2, Plex can handle them just fine. (I strongly assume the decoding process is something you can not do with the ReadyNAS.)
And, of course, no PQ-degrading transcoding necessary for .mpeg2, or other non-mp4 formats.
“Do you hook yours up to you HDTV? Do you connect a Drobo to the Mac Mini for extra storage?”
I started with a single Mac Mini under my HDTV, which functioned as a Plex client, general versatile HTPC, NAS controller, and other various serving/receiving functions. Everything worked fine. But eventually, I bought a second Mac Mini to run headless and stash my NAS and its jungle of attached drives and coasters out of sight to reduce clutter. Not strictly necessary, but seemed an affordable luxury considering amortization.
I’ve avoided Drobos since I fear proprietary storage solutions like that. But you could certainly put a single Mac Mini under your HDTV, run ethernet to a Drobo further away, and have that all work just fine as a solution.
Chucky’s long been a proponent of the Mac Mini as a household hub. While there are many benefits, one of the core and original purposes of a NAS is data backup… and those RAID capabilities are awfully compelling. (Doubling your price with a Drobo on the Mac may not be the best answer – and I too shy away from proprietary solutions from startups.)
“While there are many benefits, one of the core and original purposes of a NAS is data backup… and those RAID capabilities are awfully compelling.”
I’ve always liked using toasters and cycling drive backups out-of-home as the best data protection. But to each his own…
(And, of course, there are low-cost RAID drive enclosures you can hook up to a NAS PC, if you feel the need for RAID.)
Yeah, the problem with consumer-level NAS devices is that they aren’t fast enough to transcode video for Plex. That’s fine if your Plex clients are real computers, but if you want to watch locally on roku/iOS/android or remotely on anything, you’ll need to transcode.
I personally don’t find 2-bay NAS devices very attractive. You have to mirror your data (unless you’re a psycho) which means that you’re paying a huge premium for that durability over purchasing a cheapo integrated single-drive NAS solution from someone like seagate or western digital.
I have a Synology 4-bay NAS and am extremely happy with it. With 4 drives, you get the total capacity of 3 of them and zero data loss if any of the four dies. Which has already happened to me once.
I do use Plex, of course, but I run the plex media server on my HTPC, which is more than fast enough to transcode. The NAS just serves up storage.
@Jason and @Chucky You are correct with the .tivo files and decoding. Plex on the ReadyNAS does not show/index the .tivo files correctly. You would need some other process to decode to MPEG2.
Someone on Twitter asked about Sonos. Yes, it works with Sonos. You can create a new music library in the Sonos settings and point to your Music shared folder. Sonos will then index the music files for playback.
Tivodecode is open-source and will run on anything, but the CPU on the readynas is very slow so you might want to run it from a real computer. You can convert the resulting MPEG-2 files to h.264 very quickly using intel quicksync too (if you have a sandy bridge CPU or newer), which will save tons of space.
I’m part of the ReadyNAS team at Netgear and wanted to confirm what was already shared concerning transcoding. The ReadyNAS 100 series (2 and 4 bay) work great for streaming files in their native format. However, for transcoding of files on the fly you will need a box with a faster processor. The 300 series (2, 4 or 6 bay) would be the logical next step.
This looks really nice and I am starting to look for a replacement for my HP MediaSmart.
How do you get content from the ReadyNAS back to the Tivo? Does it transfer it or can it stream it? Could you view content on a Mini?
@Matthew Just checked now. The ReadyNAS appears at the bottom of My Shows on the TiVo (TiVO Roamio in my case). Once you select the ReadyNAS it will take you to a list of shows that it has archived. You can then transfer them back to your TiVo for playback.
I’ve owned older models before they were purchased by Netgear. They have incredible flexibility – the swiss army knife approach. However, I was continually frustrated by slow speeds on file transfers. If you are trying to store video or large Photo RAW files on one of these, it was an exercise in frustration accessing them or copying them. I got a fast switch and made sure full duplex was turned on, no speed increases. I have since moved to Drobo which has the accelerator component which uses a small SSD to read/write – the transfer performance is easily 2-3 times faster. Drobo is still very far behind in the integration of apps, but still outshines the ReadyNAS for me for the most important task – reading and writing files. Another frustrating constraint is that all drives need to be the same capacity or it takes the smallest drive and makes that the default. No such limitations on a Drobo. I really wish ReadyNAS had innovated a bit quicker.
Drobo always scared me a little due to its proprietary file system… but it’s certainly gotten many accolades over the years. Surprised someone didn’t acquire them.
Dave, I think they were pretty buggy early on, seems like they are rock solid now. I’m impatiently waiting for Transporter to be integrated (they merged companies) – private Dropbox-like functionality so you can have your own private cloud.
The readynas 102 doesn’t support disk spindown, which is a major oversight. Most people don’t want their disks spinning 24/7 for power/noise reasons. Many competing products (Synology, Qnap) already support this basic feature.
When using the ReadyNAS with TiVo for extra TiVo storage? Does it work like TiVo Desktop where the content needs to be transferred back to the TiVo to watch it? Or can it be streamed from the ReadyNAS like content between TiVos?
You browse the ReadyNAS from the TiVo, then select the show you want. It will start to transfer back to your TiVo, but you can begin playing it. This was from the TiVo Roamio at least.
I am also using a mac mini (2011 version) as my plex trancoder and it is fed from a drobo fs. No issues streaming to multiple devices. No issues with the drobo other than swapping to two of the 5 2tb drives for 2 4tb drives when we ran low on storage space.
I have purchased ReadyNAS 102 , i want to replace the hard drives that was formatted from another (old ReadyNAS 102) . so will i loose the data?
please any help!